CAMERA SENSOR CLEANING
If you’re using an SLR camera, you’ll eventually encounter spots due to a dirty camera sensor. If it hasn’t happened yet, don’t worry — it will. When it does, you’ll need to know if what you’re seeing is indeed from sensor dust, or is instead the result of a dirty viewfinder, mirror or lens. Most importantly though, you’ll need to know how to clean the sensor, and how to minimize the risk of this happening again .
A dirty camera sensor is most apparent in smooth, light regions, such as bright skies .
The exact appearance can change depending on the nature of the dust, image content and exposure settings (see f-stop example below), but will likely look similar to the above example. However, even if the dust isn’t immediately apparent, it still reduces image quality by decreasing contrast. In the above example, note how some of the spots are much fainter than the others (look closely — there are at least eight).
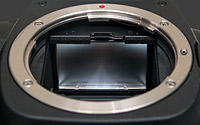
Dust appears as diffuse spots because the particles themselves aren’t actually sitting on the camera sensor’s photosites — they’re instead located slightly above the sensor, on the outermost surface of the sensor’s filters .
This causes the particle to cast a shadow, which is what we’re actually seeing in the image (not the dust itself). This is also why lower f-stop values make dust shadows more diffuse, since this light reaches the sensor over a wider angle, and therefore more easily passes around the sides of the particle .
Just because you see spots in your viewfinder and/or images, this doesn’t necessarily mean you need to clean your camera sensor. Other sources of dust include .
(1) Viewfinder focusing screen and SLR mirror. This type of dust is clearly visible in the viewfinder, but fortunately doesn’t alter the image file.Try looking through your viewfinder and changing the f-stop (while holding the depth of field preview button).Viewfinder dust will appear the same size regardless of the f-stop.
(2) Front or rear of your lens. This one is a little trickier to diagnose because spots on your lens may also impact your image. Try changing your camera lens to see if the spots remain. Lens spots generally appear larger and more diffuse (than sensor dust), and are usually only visible with wide angle lenses at high f-stops (near f/22+).
In either case, dust will become more apparent when you aim your camera at a clear sky or light-colored wall. If neither of the above is true (and you’re still seeing spots in your images), it is safe to assume that the dust culprit is your camera’s sensor.
OPTIONAL: How to Locate Sensor Dust. While sensor dust is never ideal, sometimes it’s helpful to know just how dirty the sensor really is. Are there more spots than you thought? Are these near the middle of the frame — potentially appearing unexpectedly with high f-stop portraits — or are they just at the edges? Some dust is often acceptable when weighed against the risk of scratching your sensor or SLR mirror during the cleaning process. The easiest way to assess the situation is to (i) aim your camera at a smooth, light background such as a white wall, (ii) defocus the lens (so the background appears smooth and textureless), (iii) apply a +1 or +2 stop exposure compensation and (iv) take a photo at your lens’s highest f-stop setting (usually f/22 or f/32). The resulting image provides an excellent map of sensor dust.
To improve visibility, you can also increase the image’s contrast using “auto levels,” or you can drag the black point slider of the levels tool to the right while holding the ALT key (in Photoshop). Just be aware that your dust map is flipped compared to the physical dust positions; spots at the top of the image are created by dust at the bottom of the sensor, for example .
Source : https://www.cambridgeincolour.com