
SENSOR CLEANING METHODS
A camera sensor should only be cleaned when absolutely necessary, since doing so carries a risk of harming your camera’s sensor* or SLR mirror.
Why is it risky? Cleaning requires flipping up your SLR mirror to give open access to the camera’s sensor. If the camera’s battery dies before cleaning is complete, the mirror can shut onto your hand and/or cleaning apparatus — thereby harming the mirror in the process. In addition, direct contact with the sensor can drag new or existing contaminants across the camera’s surface — creating micro-abrasions or scratches.
Regardless, if you do decide that your sensor needs cleaning, the aggressiveness of one’s cleaning strategy should also fit the severity of the problem. Listed in order of increasing effectiveness (but also of increasing risk), the most common types of cleaning devices include:
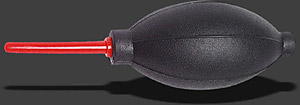
Sensor Blower. This carries the least risk of harm because it never comes into direct contact with the sensor, but it’s unfortunately also the least effective — especially if your dust adheres to the sensor’s surface. This tool also has a high chance of just moving all of the dust around — potentially making the problem appear even worse. Only use blowers specifically designated for camera sensors; standard compressed air blowers may release a damaging coolant liquid.
اSensor Brush or Sweep. This is often seen as a good compromise between risk and effectiveness. It will likely remove all but the most stubborn dust, and generally has little risk of scratching if it only makes light contact. There are even types which are designed to surgically remove individual particles (without having to sweep over the whole sensor). An added bonus is that you can also use a sensor brush to remove dust from your SLR mirror and focusing screen; just make sure to avoid inadvertent contact with either, and only clean the sensor on well charged batteries.
Sensor Stamp or Pen. These make full contact with the sensor, but aren’t dragged across the sensor surface, so they are less likely to cause a scratch. Their tip usually consists of deformable silicone, which gets pressed onto the sensor’s surface, and is more likely to mold around the dust particle (and hold onto it) than the more rigid sensor surface. Try to avoid using products that instead work by using an adhesive, since this has the potential to leave a residue on the sensor surface.
Sensor Swab, Wipe or Wand. This can remove even the most enduring particles, but requires careful technique. The device usually consists of a small, flat-edged paddle that is wrapped in a special lint-free tissue that’s had sensor cleaning fluid applied. Make sure to get one with a width that’s designed for your sensor size (cropped sensors generally need a narrower swab than full frame sensors).
Sometimes several devices can be purchased together as a sensor cleaning kit, but if you only plan on purchasing or carrying one, the sensor brush or stamp is usually adequate. If you have more than one, it’s often a good idea to try several tools in succession (although some skip the blower). Ideally you won’t have to use a sensor swab, but if you do, this way most of the larger and more abrasive particles will have been removed prior to making full contact with the sensor.
Source : https://www.cambridgeincolour.com
![]()
![]()
![]()