HOW TO CLEAN YOUR SENSOR
We’re not going to delve into the details of using each tool, since there are many variations. However, there are some universal steps, and knowing what cleaning might entail can give you a better idea of whether this is something you’re comfortable doing yourself. The procedure below therefore provides the general steps needed when cleaning with sensor brushes and/or sensor swab tools. You are responsible for also consulting the instructions that came with your specific tool.
- Prepare. Read through all these steps ahead of time so that you are familiar with each step and have everything necessary to perform each in succession. Make sure that you choose a block of 15-20 minutes where you are unlikely to be interrupted, and that your mobile phone has been turned off. It’s also good practice to clean the camera body, lens and lens mounts with a damp cloth, since this dust could potentially end up on your sensor later on.
- Check Battery. Fully charge your camera battery if it has less than half its charge.
- Choose Location. Locate yourself in a clean environment with relatively still air.
- Arrange Tools. Have all necessary tools ready and easily accessible.
- Set Camera to Cleaning Mode. Set your camera to “manual cleaning mode” (or similarly named mode). Consult your camera manual if necessary.
- Position Your Camera. Remove any attached lenses and place your camera on its back on a flat surface, giving easy and visible access to the sensor.
- Clean Using One or More of the Tools Below.
a) Sensor Blower: Send several puffs of air into the camera body while the camera is facing downwards. After each puff, wait 5-10 seconds for any dust to settle out. Once complete, you’ll usually also need to use one of the other tools below.
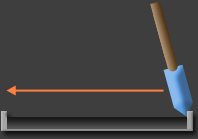
b) Sensor Brush: Gently place the bristled end of your brush at the edge of your camera sensor, and follow the motion shown in the diagram above. Apply only very light pressure — much less than if one were actually painting — since sensor brushes work by electrostatically attracting dust particles to their fibers, and not by actually scrubbing these off the sensor physically. Just try to whisk away the dust. Also, try to prevent the brush bristles from touching anything outside the sensor’s edges, since this may transfer camera lubricants or other contaminants onto the sensor.
c) Sensor Stamp: Gently press the cleaning end of this tool against your camera sensor’s surface, but avoid dragging this across the surface since it can leave streaks or scratches. If the stamp area is smaller than your sensor’s area, use placements that minimize the number of times it needs to be pressed against the sensor.
d) Sensor Swab: Affix the cleaning tissue to the end of your cleaning tool, and place 2-3 drops of cleaning fluid on the tip of your tool (if either wasn’t already performed the way it came). Gently place the tissue-covered end of your tool on the edge of the sensor and follow the motion shown in the diagram above. You shouldn’t apply any more pressure than you ordinarily would when writing with a fountain pen. - Verify Cleaning. Turn your camera off and re-attach your lens, then take a test photo of a smooth, light surface using your lens’s highest f-stop value. Consult the “how to locate sensor dust” instructions at the start of this tutorial for additional details on performing this step. If the remaining dust is unacceptable, then you’ll need to repeat the above steps — perhaps by using a more aggressive tool such as a sensor swab instead of a brush.
Source : https://www.cambridgeincolour.com


